![]()
If you want to use CD Writer Suite, you'll need a recorder. Most (all?) current CD/DVD recorders are IDE devices. You can choose to connect the recorder to the Falcon's SCSI port using a SCSI adapter. This is the simplest solution, as it’s exactly like connecting a SCSI device. Here we list some adapters that we have used successfully.
You can also connect the DVD recorder to the IDE bus. This will allow for higher speed data transfer, as well as saving the cost of a SCSI adapter. With a CT2, up to 10x is possible for recording CDs, compared with 6x if you are using SCSI. For DVDs the corresponding speed is 1.2x vs. 0.6x.
If you have a recased Falcon, connecting a second IDE drive should be relatively straightforward. The following solution is aimed at those users who prefer to use the Falcon in its original case. It uses inexpensive parts that are commonly available (except perhaps for the gender changers).
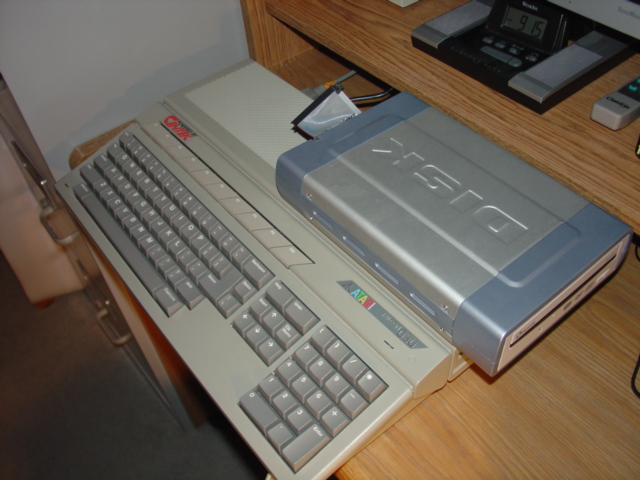
Since there is no room in an original Falcon case for a second IDE device, you will need to run an IDE cable out of the case. Because the total length of an IDE cable must be 18” (45cm) or less, you will need to sit the recorder on top of the Falcon, as in the picture below, or on a shelf nearby.
An IDE/ATAPI recorder :-). For best results with ExtenDOS / CD Writer Suite, consult the list of tested drives, or contact Anodyne Software. Choose either
| an internal version that normally installs in a PC box. You will need an external case, typically one designed for USB and/or Firewire connection. Choose one that is as small as possible. You will need to make a slot for the external IDE cable, so look for a plastic back where you can carve a slot with an X-acto knife. You will not be using the USB or Firewire ports at the back. | |
| an external version (which will normally be connected via USB or Firewire). In this situation, make sure the drive inside is IDE/ATAPI. |
The recorder pictured here is an internal Plextor PX-716A installed in an external USB/Firewire case.
You will need these parts too:
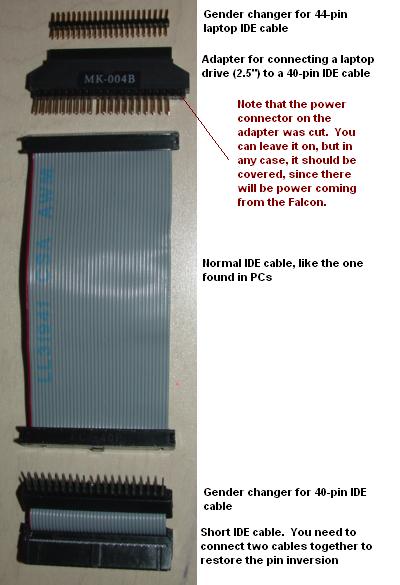
| laptop drive IDE cable with three connectors. | |
| laptop drive adapter (2.5” – 3.5”) | |
| gender changer, for 44-pin laptop IDE cable | |
| gender changer, for 40-pin IDE cable | |
| Two IDE cables |
For the recorder configuration itself, consult the manual. You should disable "Ultra DMA", if the drive supports it; this is normally done with a jumper. You should also make the unit a "slave", also accomplished with a jumper. Verify that your internal hard disk drive is jumpered as a "master".
If you own the Centurbo2 accelerator, configure it so that IDE wait states are ON.
Add IDE-1 to your hard disk driver scan. IDE-1 is the bus/ID combination for your new recorder.
Adjust the length of the cables to suit your system best, keeping the total length of the three cables to 18” or less (shorter is better). You will probably need to reposition the connectors and shorten some cables.
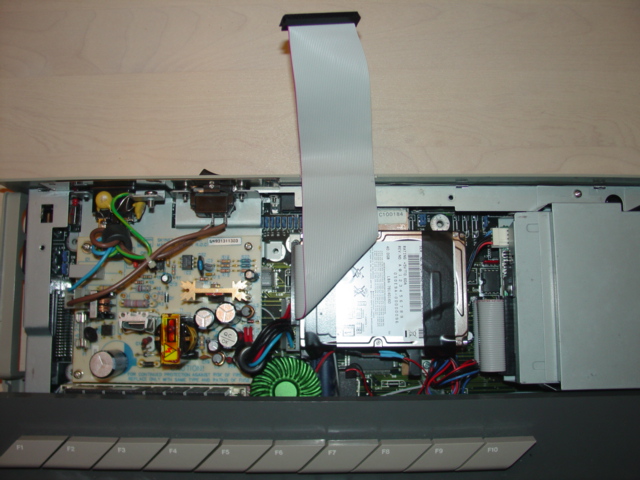
The picture below shows the laptop drive IDE cable. One of its three connectors is attached to the Falcon motherboard, another is going the internal laptop drive and the last connector is outside the case. A section was cut out of the rim of the bottom part of the Falcon case to allow space for the cable to go through.
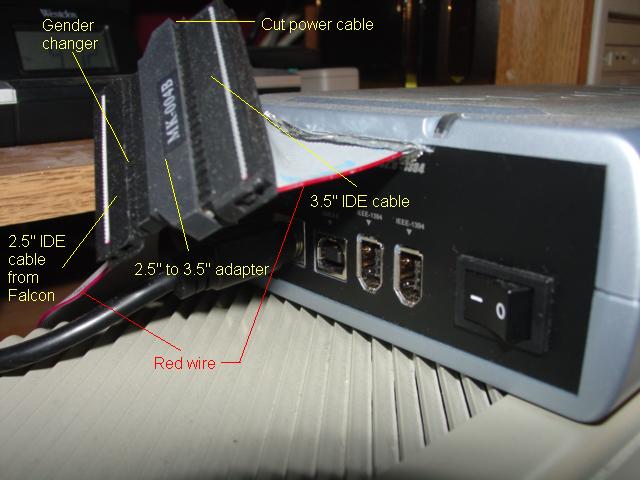
The picture below shows the remaining cables and adapters, and how they connect. Why are two IDE cables needed? If you use only one, the vertically arranged pins 1-2, 3-4, etc. are inverted into 2-1, 4-3, etc. This is due to the way cables connect together. By adding another cable, the pins are inverted again to the correct arrangement.
Do not use ultra-DMA cables (the ones with 80 wires), which may be included with the recorder; use the plain old 40-pin cables. You will also need to verify that your drive is not in ultra-DMA mode. Consult your recorder manual.
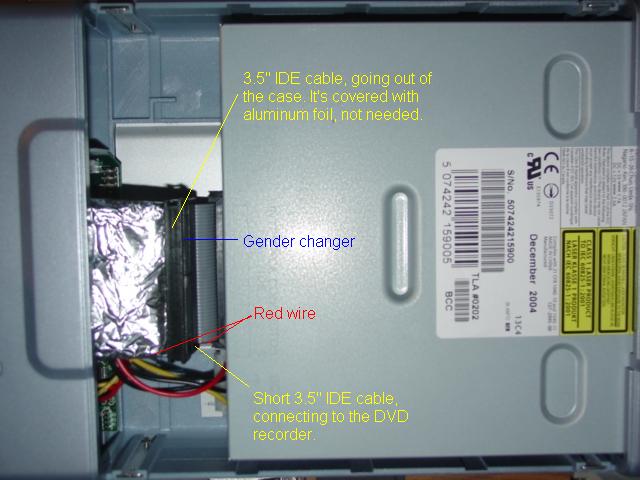
Remember to always align the red wires on the cables. The 44-pin gender changer plugs into the laptop cable coming out of the Falcon. The short IDE cable plugs into the DVD recorder inside the case.
Here is a picture inside the drive case with the IDE cables installed. Note that the IDE cable is shown shielded with aluminum foil, but this is not required and could cause an inadvertent electrical short if you are not careful.
Your drive make and model should be displayed at boot by your hard disk driver. If not, review the Configuration section above. Also verify the positions of the red wires on the cables.
Run INSTALL.APP and do a scan. Your recorder’s make and model should be displayed under IDE bus, ID 1. Refer to the ExtenDOS 4 manual for further details. You’re done! Now you too can enjoy backing up your whole hard disk to a single DVD – twice over in my case.
![]()